
STEP-BY-STEP GUIDE
How to use the calculator and status check.
Every step with a picture. The numbers on each picture match the list under it.
تصویروں کے ساتھ مکمل رہنمائی — ہر تصویر کے نمبر نیچے دی گئی فہرست سے ملتے ہیں۔
STEP 01
Start with your semester or year
سب سے پہلے اپنا موجودہ سمسٹر یا سال منتخب کریں۔
The calculator asks one question at a time. Your first answer decides which marks it needs.
- Open the calculator on the home page.
- Under "01 Where are you studying?", pick your current semester or year: 1st semester / 1st year if you are starting your degree, or 2nd semester / year onward if you are already studying.
- The next question appears as soon as you answer.
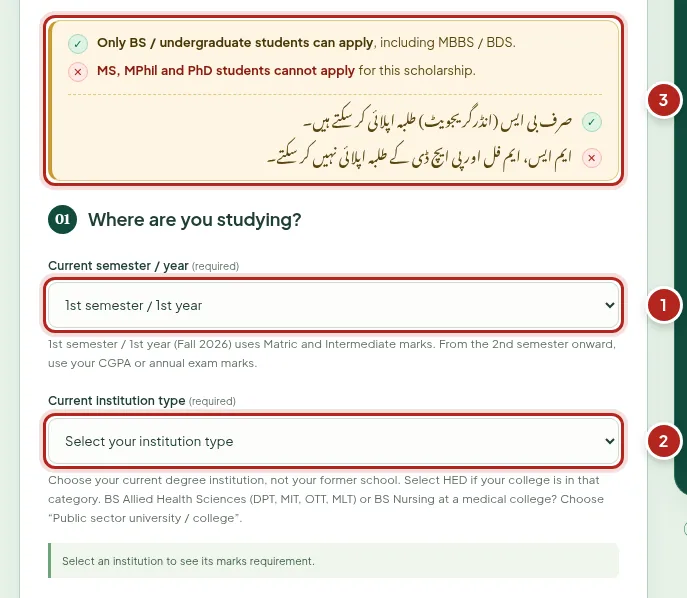
- Your semester or year
- The next question appears
- Only BS / undergraduate students can apply
STEP 02
Choose your institution type and stream
اپنے ادارے کی قسم اور موجودہ ڈگری کا شعبہ منتخب کریں۔
The minimum marks depend on where you study and on your current degree.
- Pick your institution type: public university or college, public medical or dental college (MBBS / BDS), federal or private university, or HED college.
- Pick the stream of the degree you are studying now (Sciences, or Arts & Social Sciences), not your Matric or Intermediate subjects.
- Optionally choose your institute and discipline from the official lists. They appear on your result slip.
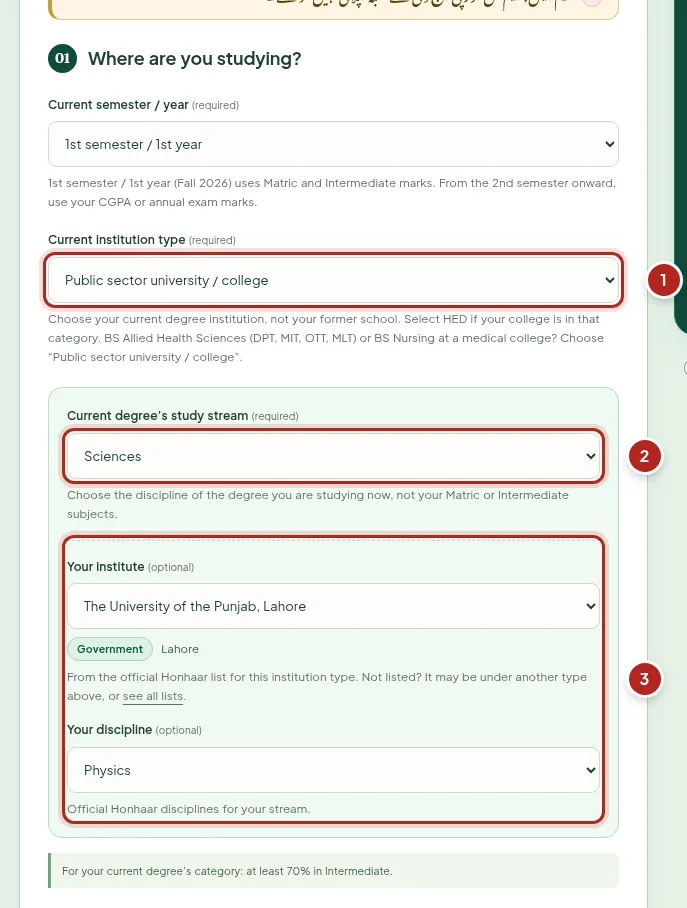
- Institution type
- Your current degree’s stream
- Optional: your institute and discipline
STEP 03
1st semester: add your Matric and Intermediate marks
میٹرک اور مکمل انٹرمیڈیٹ کے حاصل کردہ اور کل نمبر لکھیں۔
Keep your Matric and Intermediate result cards next to you.
- Under "02 Add your marks", type your Matric (SSC) obtained marks. The total is filled in as 1100; change it if your result card shows another total.
- Type your combined Intermediate (Part I + Part II) obtained marks. The total is filled in as 1200; change it to match your board’s result card.
- Press Calculate my aggregate.
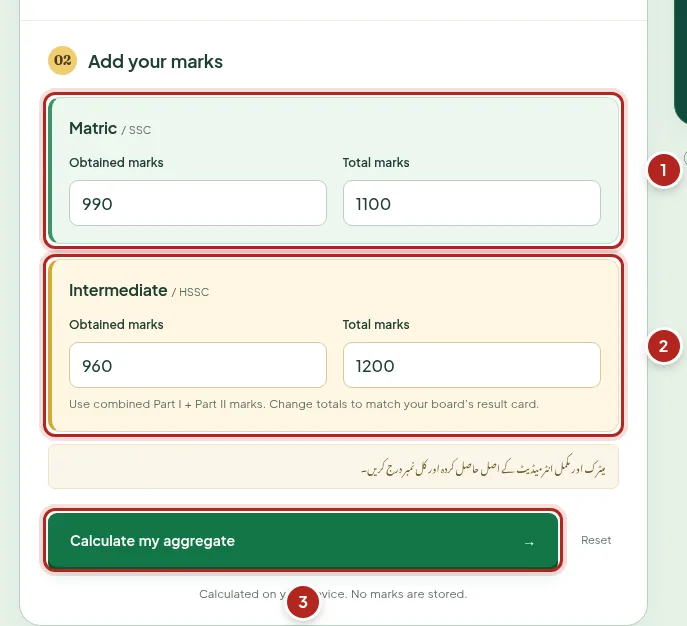
- Matric obtained and total marks
- Intermediate (Part I + II) obtained and total marks
- Work out your result
STEP 04
Read your result
نتیجہ: آپ کا ایگریگیٹ اور مطلوبہ کم از کم نمبروں سے موازنہ۔
The result card appears next to the form on a computer and below it on a phone.
- The big number is your aggregate (1st semester) or your percentage (2nd semester onward).
- The label says whether your result meets the academic requirement for the category you chose.
- Below it you see your own percentage next to the minimum required.
- Change any answer or mark and press the Calculate button again; an old result is cleared as soon as you edit.
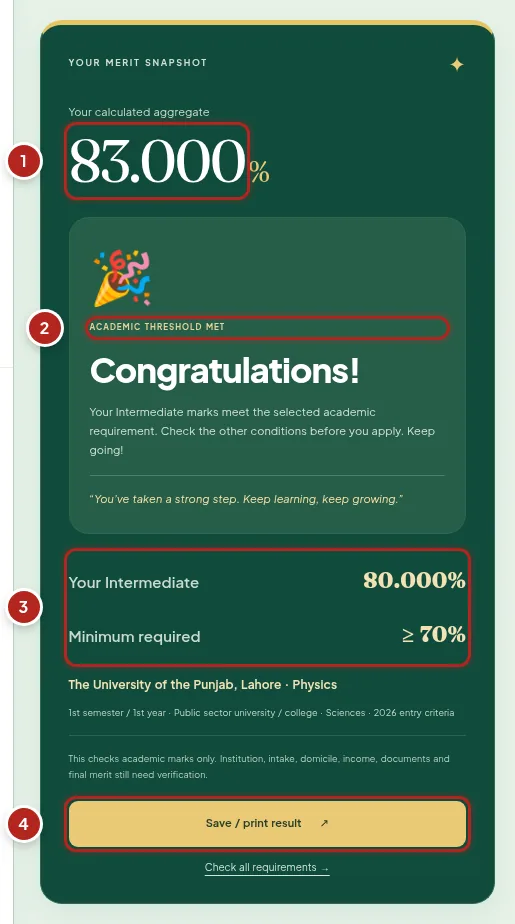
- Your aggregate
- Meets the requirement, or below it
- Your percentage and the minimum required
- Print your result slip
STEP 05
2nd semester onward: your CGPA or annual marks
دوسرے سمسٹر یا سال سے آگے: اپنا CGPA یا سالانہ امتحان کے نمبر لکھیں۔
From the 2nd semester or year, only public sector institutions are eligible, and the calculator asks for your current degree’s result.
- Choose 2nd semester / year onward, then your institution type and stream.
- Under "Your result system", choose CGPA if your degree has semesters, or Annual exam marks if it has yearly exams. MBBS / BDS uses annual exams.
- For CGPA, type the cumulative CGPA on your latest transcript and choose its scale (4.00 or 5.00). For annual exams, type the obtained and total marks of your latest annual exam.
- Press Calculate my percentage to see your percentage and whether it meets the requirement.
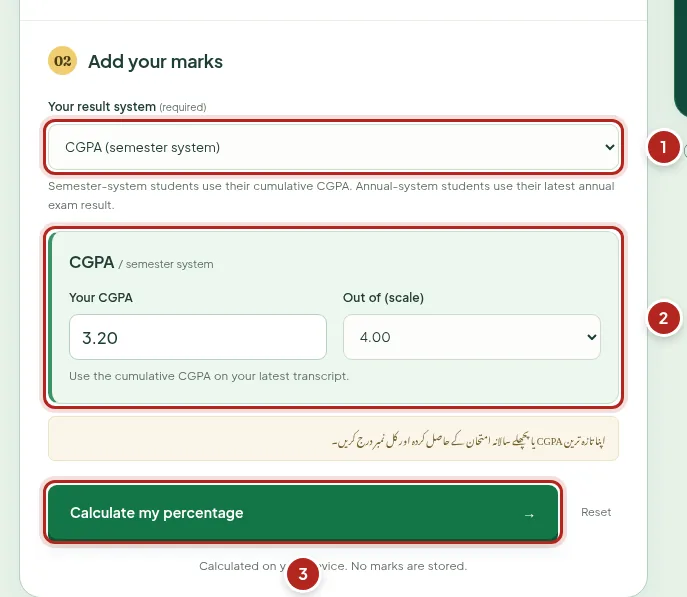
- Your result system: CGPA or annual exam marks
- Your CGPA and its scale
- Calculate my percentage
STEP 06
Print or save your result slip
اپنا نتیجہ پرنٹ کریں یا PDF کے طور پر محفوظ کریں۔
A clean one-page slip to keep or show your financial aid office.
- After calculating, press Save / print result on the result card.
- Your browser’s print window opens with a slip that has your category, your marks and your result.
- Choose a printer, or "Save as PDF" to keep it on your phone or computer.
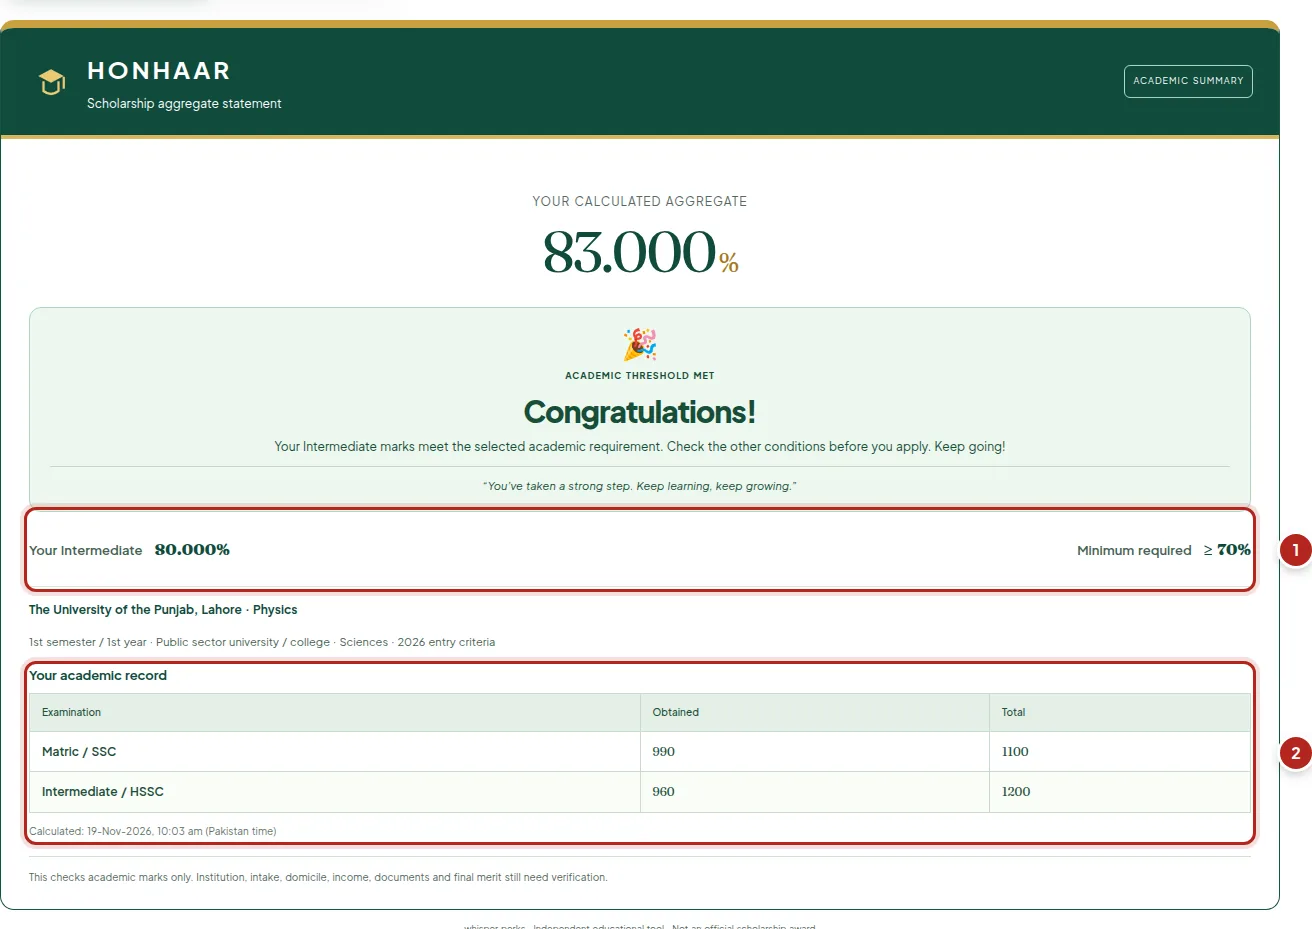
- Your result and the requirement
- Your academic record
STEP 07
Find your institute and discipline
منظور شدہ اداروں اور شعبوں کی فہرست میں اپنا ادارہ تلاش کریں۔
Your institute and degree must be on the programme’s official lists.
- Open Institutes & disciplines from the menu.
- Jump to disciplines, universities, medical and dental colleges or HED colleges.
- Type in "Search the lists" (a city, subject or college name) to show only the matching entries.
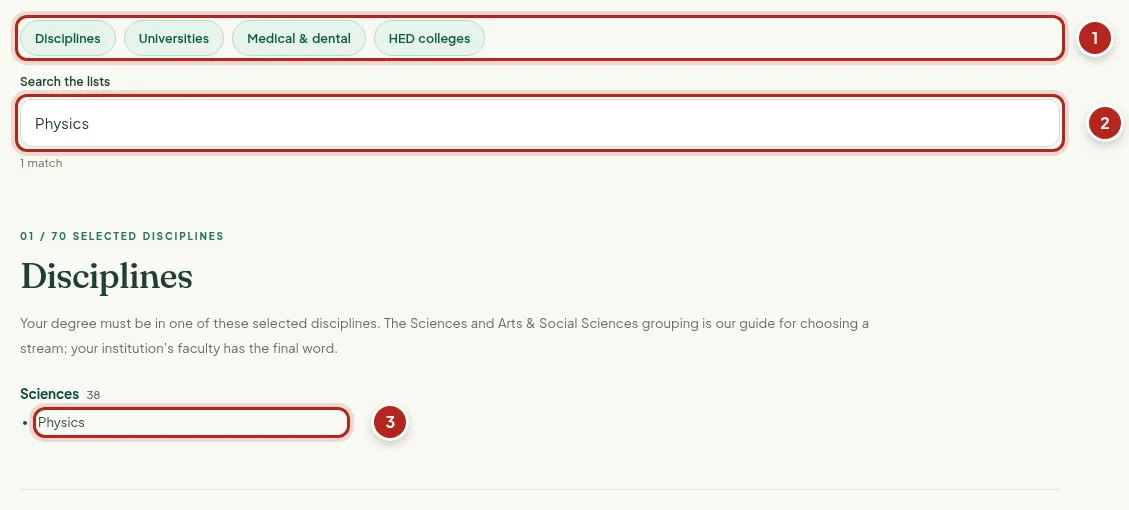
- Jump to a list
- Search every list at once
- Matching entries
STEP 08
Check the eligibility criteria
اہلیت کی شرائط اور درخواست کی چیک لسٹ ضرور دیکھیں۔
Marks are only one condition. Read the rest before you apply.
- Open Eligibility criteria for the minimum marks of every category and the other conditions (domicile, approved institution, household income, application).
- Open Application checklist to prepare your documents step by step.
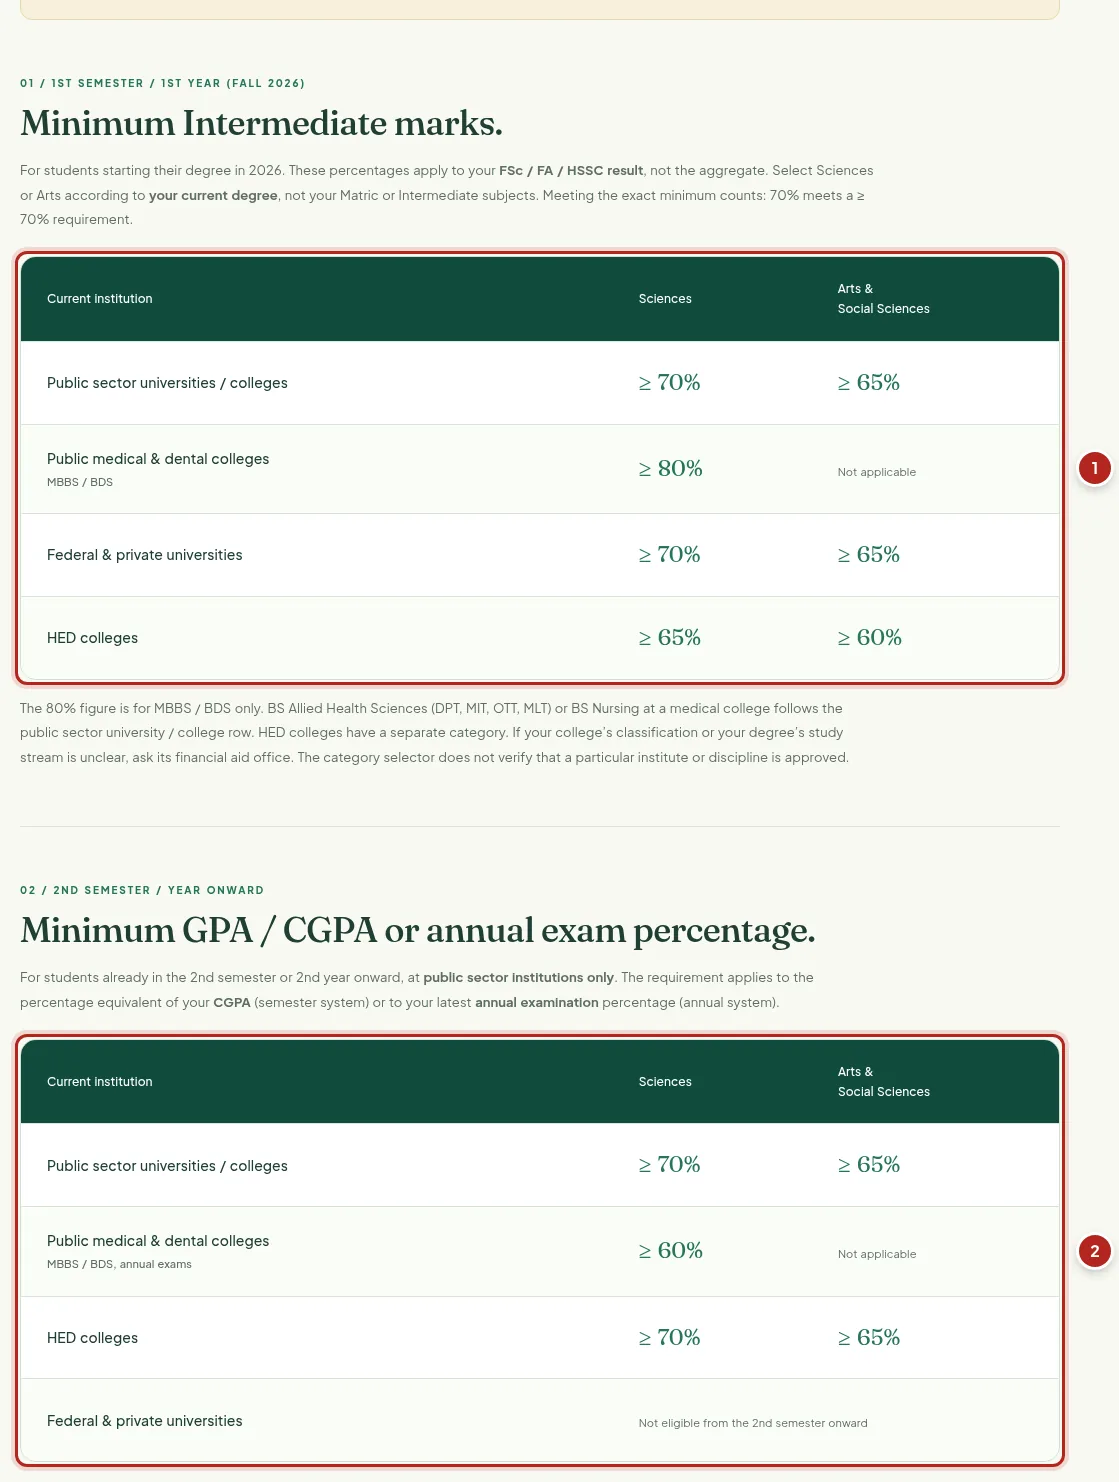
- Minimum marks, 1st semester
- Minimum marks, 2nd semester onward
STEP 09
Check your application status
اپنی یونیورسٹی منتخب کریں اور درخواست نمبر یا شناختی کارڈ سے اپنا اسٹیٹس دیکھیں۔
Already applied? The status check shows your status from the applicant list shared for your university.
- Open Status check from the menu, or the Application status tab next to the calculator on the home page.
- Type the name of your university and pick it. Only universities whose list has been added are shown.
- Under "Search by", choose Application ID or CNIC. Both are exact; a CNIC or B-Form number can be typed with or without dashes.
- Type it and press Check status.
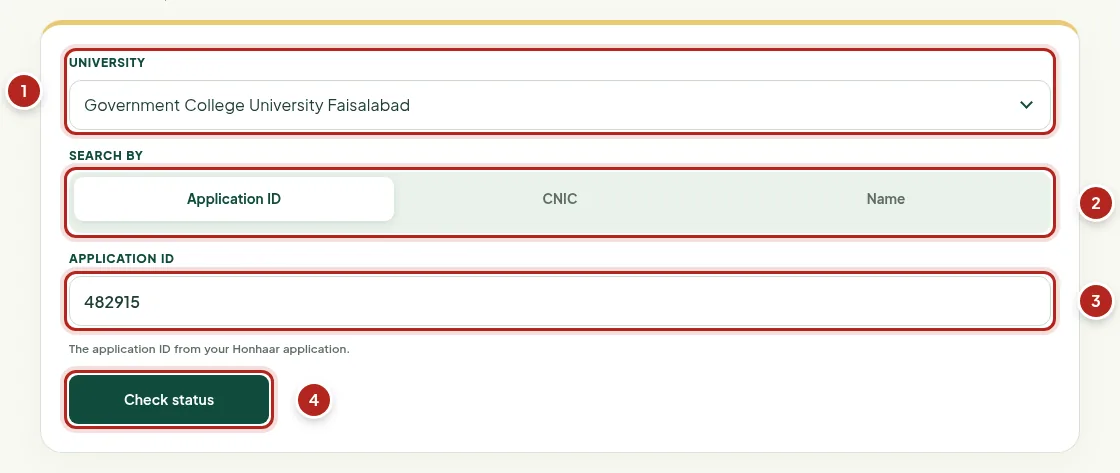
- Your university
- Search by application ID, CNIC or name
- Your application ID or CNIC
- Check status
STEP 10
Read your status
اسٹیٹس کارڈ پر اپنی معلومات، اپنا اسٹیٹس اور آگے کیا کرنا ہے، انگریزی اور اردو میں دیکھیں۔
Your record opens as a card.
- Check that the name, application ID and department are yours. Your CNIC is shown only if you searched by it.
- The coloured label is your status: Verified, Pending, Reverify or Non Verified.
- Under it you read what to do next, in English and Urdu (step 11).
- Press Print to keep a copy, or Check another for a new search.
The official Honhaar portal always has the final word on your application. What the statuses mean.
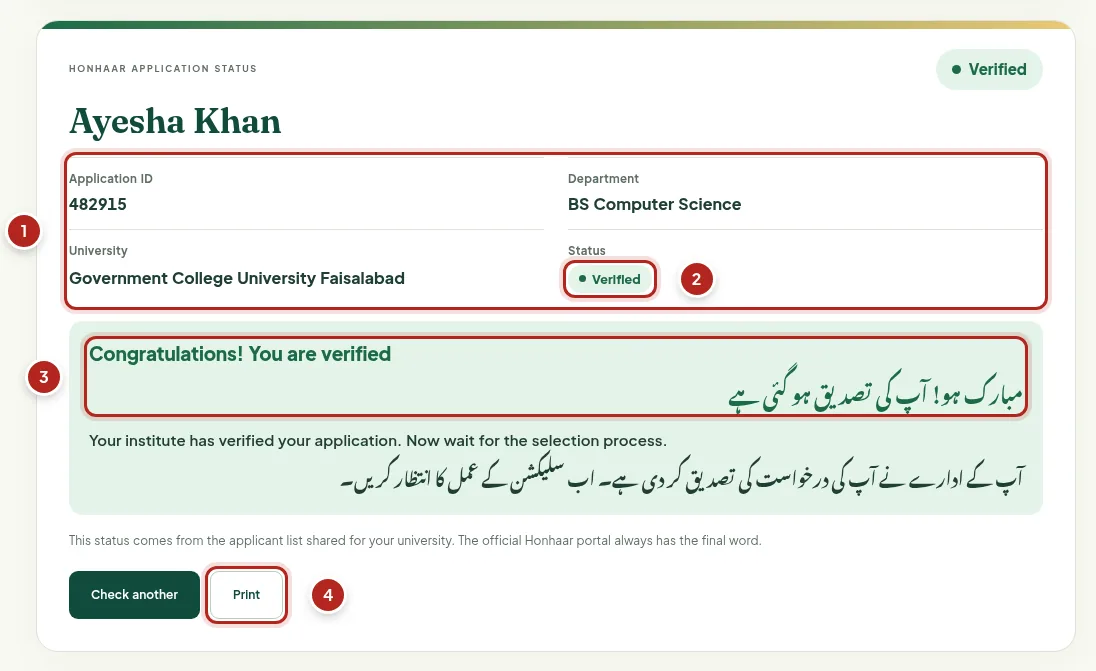
- Your details
- Your status
- What to do next, in English and Urdu
- Print a copy
STEP 11
Do what your status asks
ہر اسٹیٹس کے نیچے لکھا ہے کہ آپ کو اب کیا کرنا ہے۔ اسی کے مطابق عمل کریں۔
Every status card tells you, in English and Urdu, what to do next.
- Verified: congratulations, you are verified. Now wait for the selection process.
- Pending or Non Verified: you are not verified yet. Get the documents on the card attested by a Grade-17 (or higher) officer and submit them on paper to your department’s focal person, who can then verify you.
- Reverify: your application was most likely sent back because of a mistake. Log in to your Honhaar portal; if you see Edit Application, correct the mistake, submit again and ask your focal person to verify it again.
- Press Print to take the documents list with you.
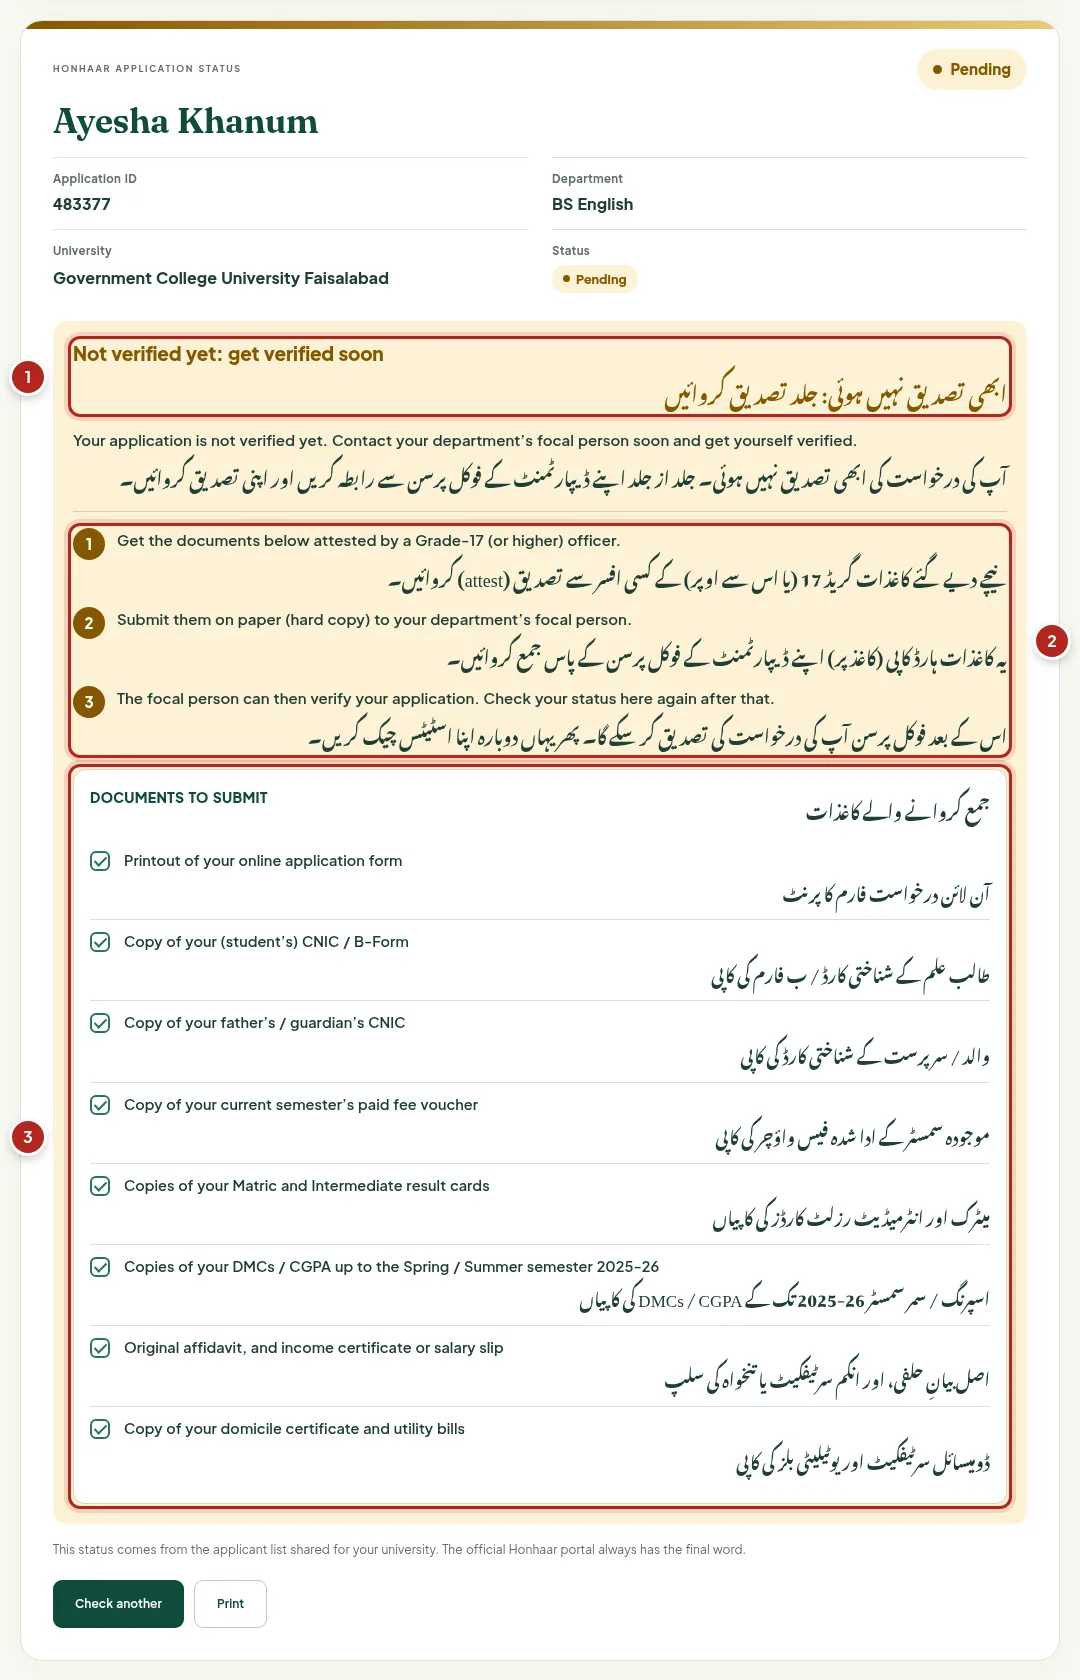
- What to do, in English and Urdu
- The steps, in order
- The documents to submit
STEP 12
Search by your name
نام سے تلاش کریں اور ملتے جلتے ناموں میں سے اپنا نام چنیں۔
No application ID or CNIC to hand? Search by name instead.
- Under "Search by", choose Name.
- Optionally choose your department; it narrows a long list.
- Type at least 3 letters of your name and press Check status.
- If more than one student matches, pick yours by the department and application ID.
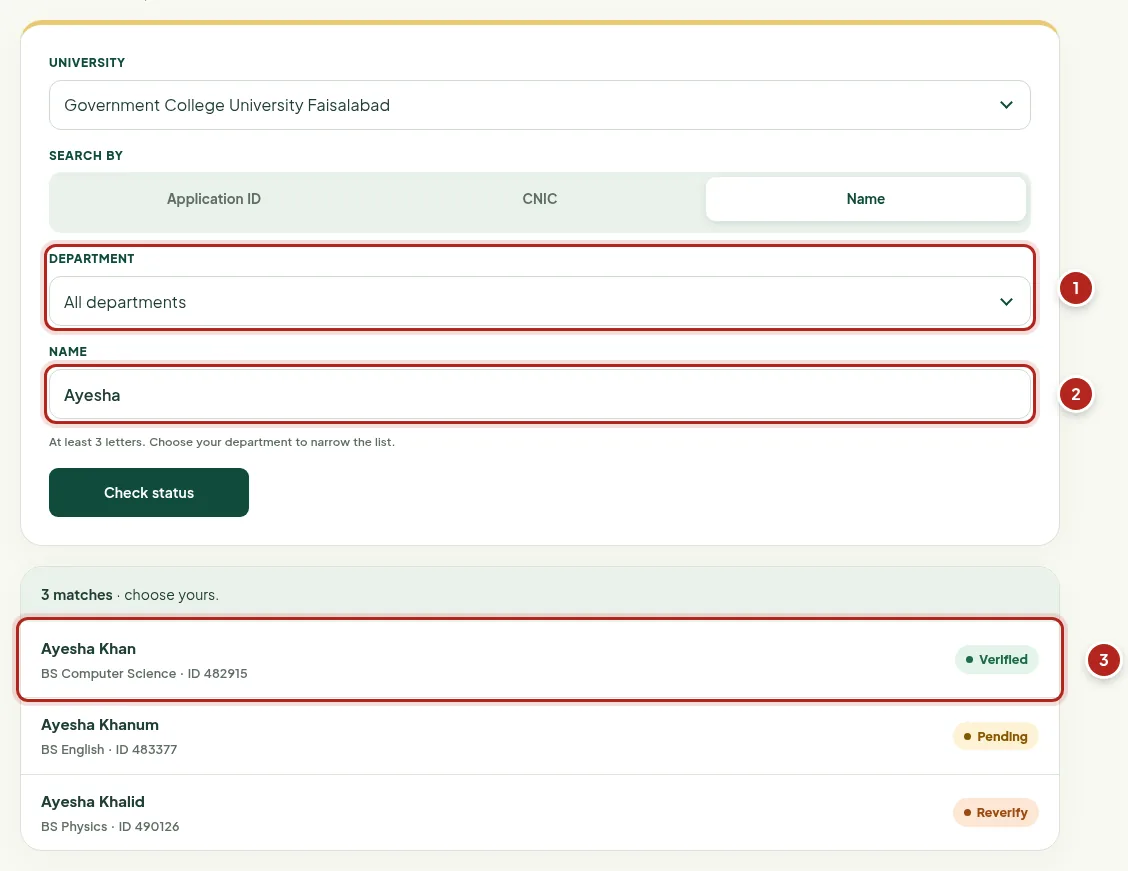
- Optional: your department
- Your name
- Pick yours from the matches
STEP 13
Using it on your phone
موبائل پر بھی کیلکولیٹر اسی طرح کام کرتا ہے۔
- On a phone the questions come first and your result appears below them.
- Use Menu at the top to open the other pages.
- Your marks are never sent anywhere or saved; they stay in your browser while the page is open. A status search downloads one small part of your university’s list and finds your record in your browser; what you type is not stored.
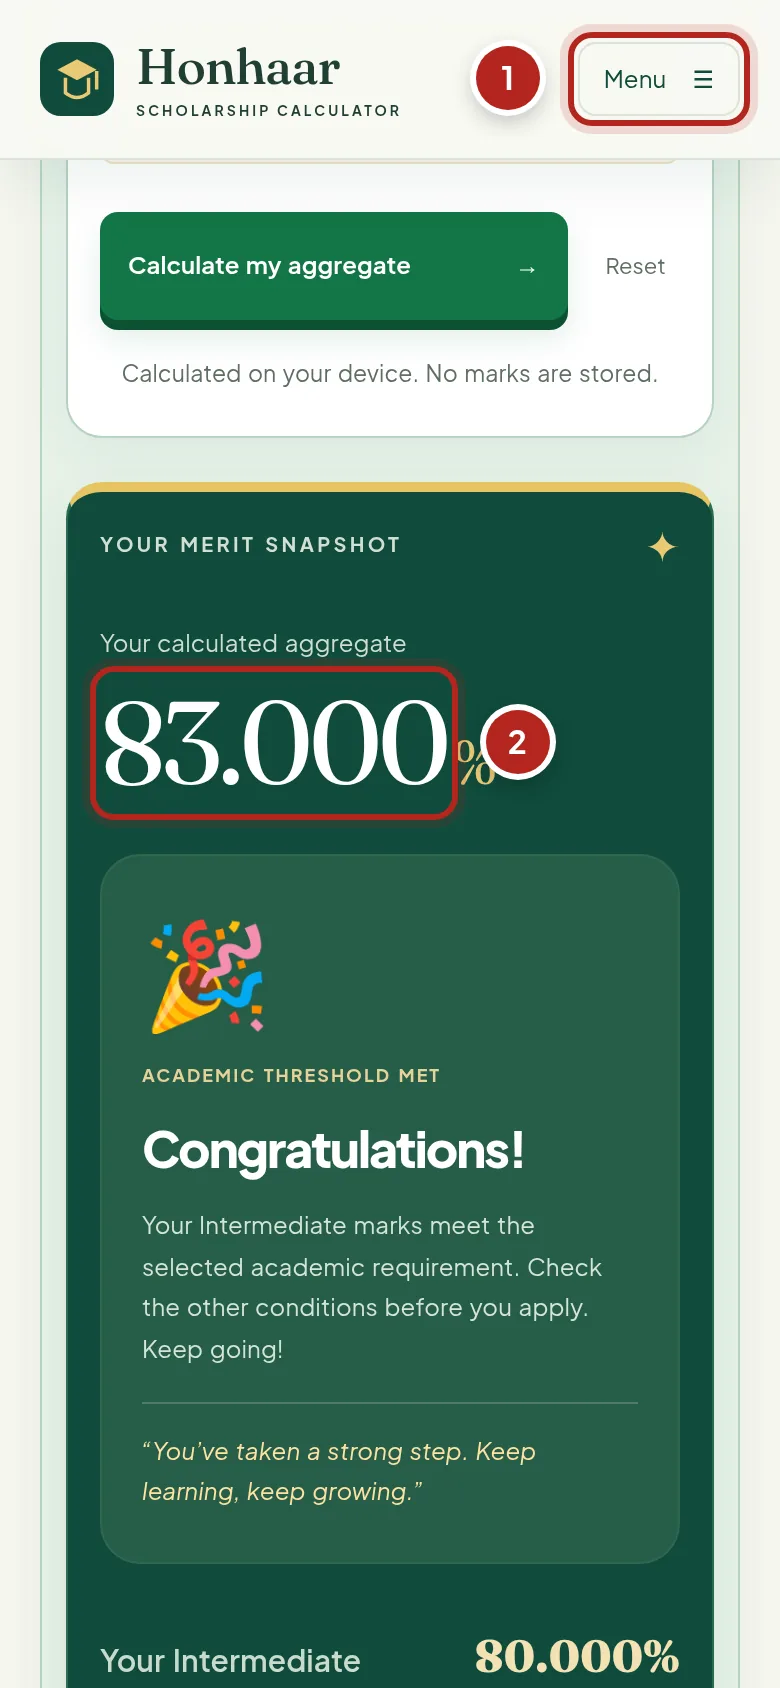
- Menu
- Your result on a phone
If something looks wrong
A field shows a red message
The number is outside what the field allows, for example more obtained marks than the total. Fix it and press Calculate again.
My result is different from what I expected
Check that the totals match your result cards (Matric 1100 and Intermediate 1200 are only the usual totals), that you chose your current degree’s stream, and the right institution type.
Federal / private is not offered
From the 2nd semester or year onward only public sector institutions are eligible, so the calculator does not offer federal or private universities there.
Does a good result mean I get the scholarship?
No. The calculator checks the academic requirement only. Selection depends on the other conditions and on the official merit list; see the eligibility criteria.
The status check cannot find me
Make sure you chose the university where you study now, and try your application ID or CNIC instead of your name. Your institute may not have shared your name yet, so check again later.
My status here is different from the portal
The status here comes from the latest list shared for your university. The official Honhaar portal always has the final word; for a status you think is wrong, contact your institute’s scholarship office.
A rule or list looks wrong
Check it against the official notice for your intake, then tell us through the contact page. It explains what to send. Applications are never made through this website.
Ready to check your marks?
Keep your result cards handy.